Workspace Navigation and Basic Motion
- Navigate the Scratch workspace, including the stage, sprite list, and block palette.
- Add, delete, and customize sprites and stage backdrops.
- Snap foundational motion blocks together to build simple scripts.
- Execute basic motion commands to manipulate a sprite's X and Y coordinates.
1. Navigate the Scratch workspace
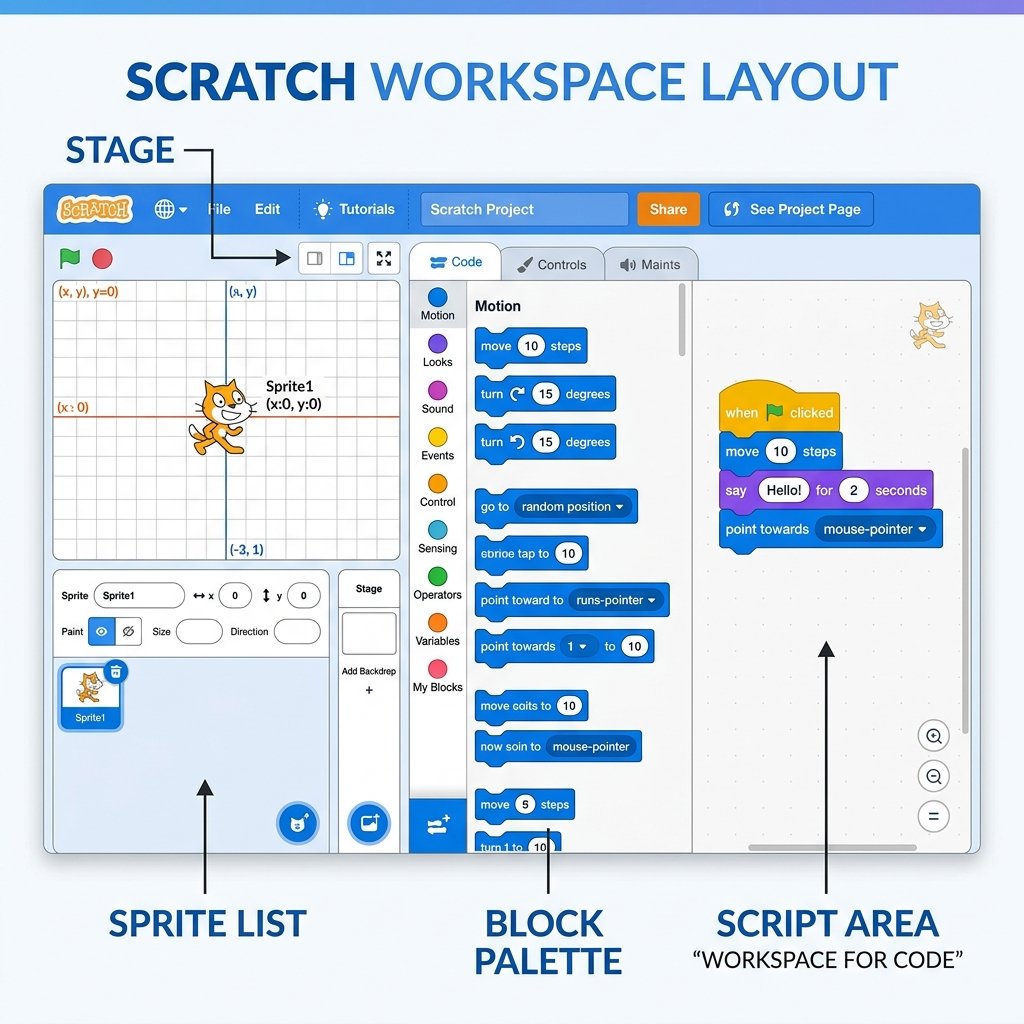
Welcome to Scratch! Scratch is a visual, block-based programming language where you build scripts by snapping colored blocks together like puzzle pieces. Let's first explore our main control centers, which form the environment where your ideas turn into execution pipelines:
- The Stage: Located in the top right, this is the rectangular viewport (480x360 pixels) where your program comes to life. It represents the visual output of your running scripts. Think of it as a theater stage where sprites are the actors performing instructions.
- The Sprite List: Positioned directly below the stage, this grid displays all the active graphic objects (sprites) inside the current project. Clicking a sprite selects it, allowing you to edit its specific scripts, change its visual costumes, or configure its audio sounds.
- The Block Palette: Located on the left side of the window, this is your toolbox. It is color-coded by category (blue for Motion, purple for Looks, gold for Control, yellow for Events) so you can quickly find the instructions you need.
- The Scripts/Coding Area: The large open workspace in the center is where you drag blocks from the Block Palette and snap them together to write programs. Each sprite has its own independent script area.
2. Add, delete, and customize sprites and backdrops
Sprites are the objects, characters, and items that carry out actions. The Stage Backdrop defines the background environment of your project. You can choose pre-made assets from the Scratch Library, paint your own in the Paint Editor, upload files from your computer, or capture them using a webcam. Customizing sprites and backdrops allows you to inject style and thematic context into your projects, preparing students for multi-scene narrative logic.
To delete a sprite, click the garbage can icon on its thumbnail in the Sprite List. To customize it, click the 'Costumes' tab in the upper left to open the Vector/Bitmap Paint Editor. Here, you can change colors, resize shapes, add text, or create entirely new drawings from scratch. This customizability is essential for establishing character personality and game aesthetics.
3. Snap foundational motion blocks together
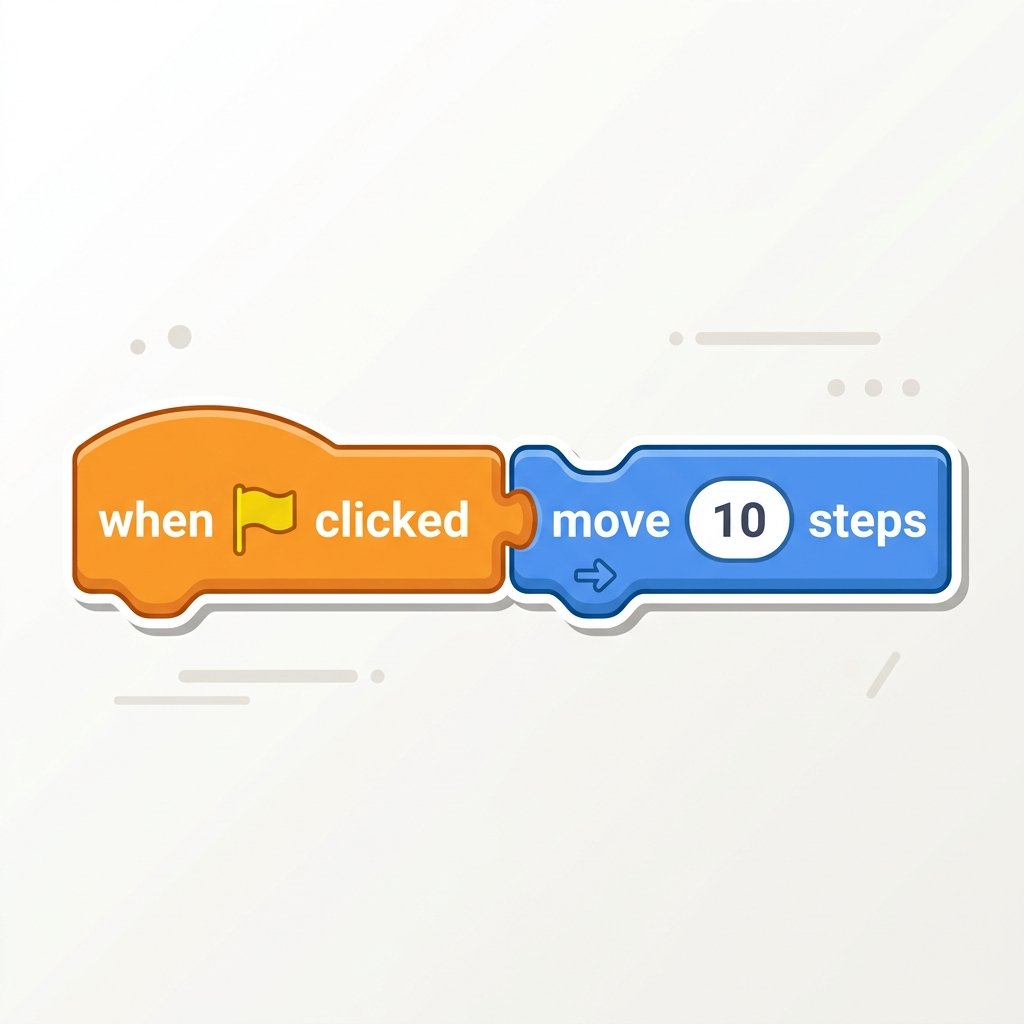
Programming in Scratch is structural and syntactic. Unlike text-based programming where a missing semicolon destroys the code, Scratch enforces structural correctness through puzzle-like notches. Events blocks (yellow) have a rounded dome at the top, indicating they are "triggers" that start a script; they cannot snap below other blocks. Standard command blocks (like Motion and Looks) have a notch at the top and a tab at the bottom, allowing them to snap sequentially under event blocks and to each other. This physical connection dictates the chronological order of execution.
Snapping blocks is the mechanical act of writing code in Scratch. When you drag a block close to another, a gray shadow appears, indicating that the blocks are ready to lock. Releasing the mouse button snaps them together. This tactile mechanism makes syntax errors impossible, allowing students to focus entirely on logic rather than spelling mistakes.
4. Execute basic motion commands (X & Y coordinates)
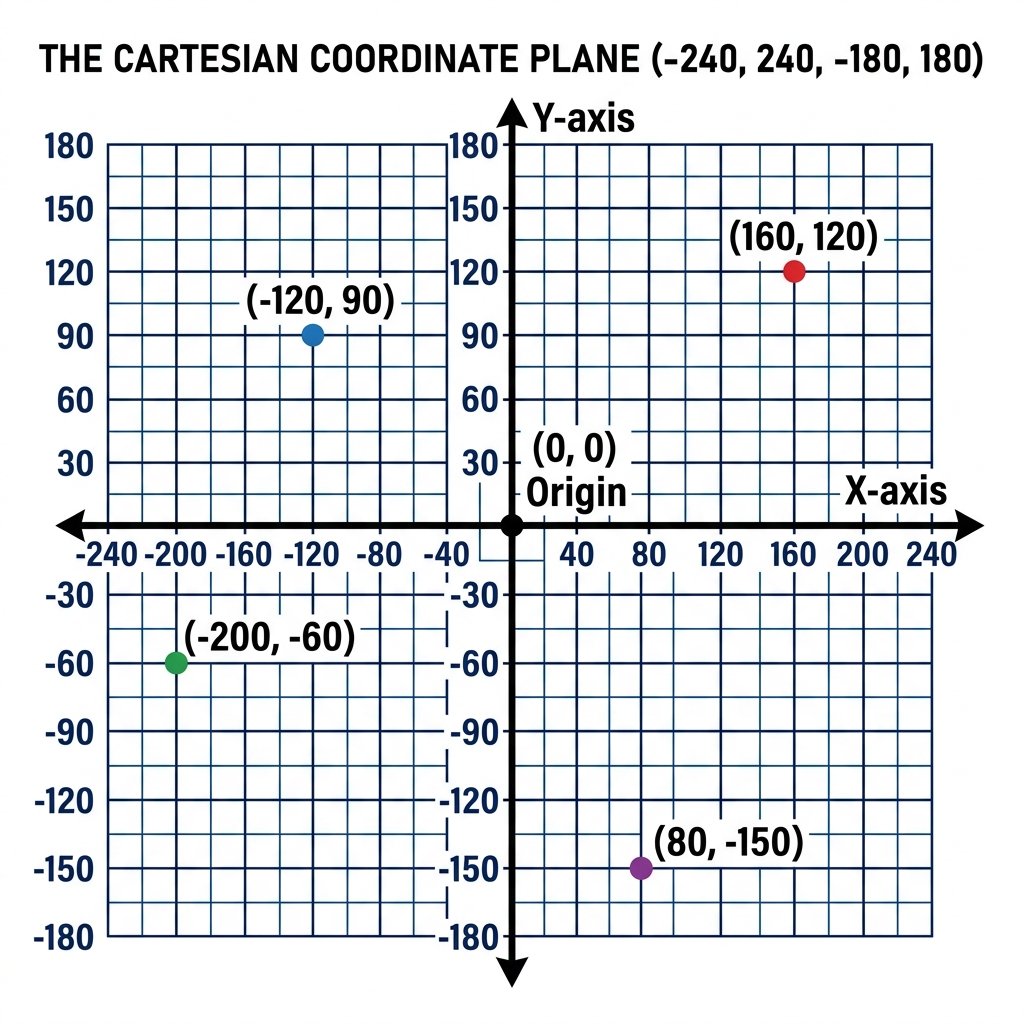
Underneath the friendly graphics, the Scratch stage is a Cartesian coordinate plane. The
stage is 480 units wide (from X = -240 on the far left to X = 240 on
the far right) and 360 units high (from Y = -180 at the bottom to Y =
180 at the top). The exact center of the stage is origin (X: 0, Y: 0). By using motion
blocks like go to x: y:, change x by, and
change y by, you command the computer to calculate and change a sprite's
pixel position, moving it horizontally, vertically, or diagonally across the screen.
Understanding coordinates is the foundation of 2D game physics. If you want a sprite to move right, you add to X. To move left, you subtract from X. To move up, you add to Y. To move down, you subtract from Y. By combining these coordinate manipulations with glide blocks, you can create smooth, calculated trajectories across the screen.
Build a Coordinate Navigator
- Open a new Scratch project and delete the default cat sprite.
- Add a new sprite of your choice (e.g., a ball or spaceship) and change the Stage backdrop to 'XY-Grid' from the library.
- Drag a yellow 'when green flag clicked' event block into the coding workspace.
- Snap a blue 'go to x: 0 y: 0' block below the event block to initialize the sprite's position at the center.
- Below that, snap a 'say [Initializing navigation...] for (2) seconds' looks block.
- Snap a 'glide (1) secs to x: 150 y: 100' block, followed by another glide block back to the bottom left at 'x: -150 y: -100'.
Model Answer Walkthrough
- Start by placing: [when green flag clicked] (Events Category).
- Immediately snap below: [go to x: (0) y: (0)] (Motion Category) to reset the sprite to the center on every restart.
- Add the dialogue block: [say (Initializing navigation...) for (2) secs] (Looks Category).
- Add movement glide blocks sequentially to drive coordinates: [glide (1) secs to x: (150) y: (100)] followed by [glide (1) secs to x: (-150) y: (-100)] (Motion Category).
- Click the Green Flag to watch your sprite move dynamically between the top-right and bottom-left quadrants!